End-to-End Guide for Load Testing
Originally published on the Abstracta blog.
If you have a public-facing web application, the odds are you should probably be thinking about load testing. Any tester can (and should) add load testing to their repertoire.
Functional tests are often carried out with a single user’s experience of your application in mind, but what happens when hundreds or thousands of users are on your site at the same time? Load testing helps prepare an application for this eventuality by simulating that situation before the application goes live. That way, you have time to fix any issues you find, and there are no nasty surprises in production.
In this guide, I’m going to walk you through the basics of the load testing process, which fits in closely with traditional functional testing phases as well:
- Planning: Why are we testing? What are we testing?
- Writing test scripts: How are we testing?
- Execution: Running test scripts against the application.
- Analysis and reporting: What happened, and what do we need to fix?
Planning for load testing
During the planning phase, the team gets together and determines what load testing will involve, including the objectives, scope, resources needed, and test scenarios. The deliverable for this phase is a test plan, but that can be as formal or informal as the team requires.
Planning for any testing is a team activity, and you’ll want to get input from all the stakeholders – that’s anyone who is involved in or might be affected by the testing. The first thing you need to clarify is the reason for load testing.
Requirements
Why are we doing load testing? seems like a very simple question, but you may be surprised by the varying answers from your stakeholders. Their reasons may require different test scenarios, so it’s a good idea to agree on the collective objectives of this load testing cycle so that expectations are set accordingly. A requirement is a concise statement of how an application should behave in a given situation.
Phrasing objectives as nonfunctional requirements (NFRs) is a good way to formalize them. An NFR defines the desired state of the application and can includes performance thresholds that the team decides on. For example: Logging in as a registered user must take no more than 3 seconds (90th percentile response time) is a requirement based on response time. Good requirements are SMART (Specific, Measurable, Agreed Upon, Realistic, and Timely).
Here are some other things that should be decided on during this phase:
Scope. What are we testing? Deciding on a shared objective for load testing lets you narrow down what areas of the application need to be targeted. Make sure everyone is clear on what won’t be tested.
Photo by Daria Nepriakhina on Unsplash
Entry Criteria. What do you need to begin? This is the time to start thinking about resources that are required for testing, including the number of people who need to be involved, the time it takes to carry out the testing, and environment requirements (including test data). You don’t always need a separate testing environment to do load testing, but if you do, that should be discussed up front so that the DevOps team knows you can’t begin without an environment.
Workload Modeling. A workload model is a set of characteristics that describe the load you’re attempting to simulate. If you want your load testing to simulate registered users accessing your site, what does that entail? This might require you to look through your site analytics to determine which pages are visited most often and which application features are most commonly used, or arrive at an estimate if analytics are not available. Are most users visiting from their laptops at lunch on work days, or do they use your site from mobile devices after work? Are most of them located in the US or in Europe? You’ll want your scripts to match real load as much as possible, so take note of key characteristics that might have an effect on the traffic your application experiences.
Server monitoring. Which application components will be involved? You want to have a plan in place to have monitoring, alerts, and logs set up on every server that will be tested by your scripts. If your load testing tool shows performance degradation, you want to be able to have information to look through on the relevant servers to troubleshoot that issue. Keep in mind that any sort of monitoring adds some resource overhead, so decide as a team what information you absolutely need to track.
Test Scenarios. Which situations do you want to recreate? A test scenario objectively describes the situation to be simulated. Do you want to recreate the load profile of a typical day, or one from a very high-traffic period, such as during a sale? Do you want to recreate a production outage? You can use analytics data to come up with parameters for your each test scenario such as duration, number of concurrent users or requests, ramp up period (how quickly the application went from 0 users to your highest number of users), or how “spiky” the load needs to be (how the number of requests per second fluctuates throughout the test).
Everything discussed in this phase should be written in some sort of a load testing plan, which could be a formal, multi-page document, an epic with many user stories, or a bunch of Trello cards. Use the tools your team already uses. The format isn’t important; formalizing the outcome of the discussions is what counts. The test plan makes sure everyone has the same intent with regard to the testing.
Writing load testing scripts
Now it’s time to start writing scripts! You’ve already front-loaded a lot of the important decisions to the planning phase, so all that’s left to do in this step is to implement the plan in the form of load testing scripts.
Tool selection

There are many load testing tools available on the market, and the reality is that you don’t always get to be the one to choose what you use. Often, companies have already made agreements with tool vendors for licenses before you begin your load testing, and it would be financially infeasible to switch to another tool. However, if you’re lucky enough that you can choose the load testing tool, here are a few considerations for assessing different tools:
Resources and costs
- How much does it cost? Does the pricing model allow for scaling usage up and down as necessary?
- Should you build or buy an end-to-end load testing solution?
- What technical skills or experience with tools does your team have? Who will be doing the testing?
Features
- Does the load testing tool support the protocols and technologies used by the application?
- How easy would it be for the team to learn this tool and/or scripting language?
- Does the tool make it easy for multiple people to collaborate on the same script?
- Does it integrate with other tools in the testing stack (for test management, test result analysis, server monitoring, team communication)?
- Could you add this tool to your CI/CD pipeline?
- Does the tool have an easy way of setting thresholds or SLOs for performance?
- Are the test results displayed in usable reports, or does the tool integrate with existing data visualization tools you are using?
Support
- If something goes wrong, does customer support cost extra?
- Is there ample documentation available online for getting started without help?
- Is there a community of users of the tool whose experiences you could learn from?
Scaling up load testing
- How many virtual users or requests per second can a single load generator simulate using the tool?
- How many load generators would you need if you used this tool?
- Can the tool handle the amount of test data required by your tests?
- Can you execute tests from different geographical locations, depending on your the location of your users?
- Does the tool allow you to generate load from the cloud?
These questions are not exhaustive, but you can use them as a starting point for your comparisons of load testing tools.
For this guide, I’m going to outline a basic script in k6 for a few reasons:
- It’s open-source, so anyone reading this can download the tool and the script and try it out for themselves;
- It’s written in JavaScript, which makes it easy to learn for front-end developers or testers who have used tools like Cypress, Puppeteer, or Playwright.
- It’s capable of generating tens of thousands of users on a single machine, so it’s cost-effective even with load ramped up.
However, the principles I discuss will be applicable to other tools. I highly recommend you conduct your own proof of concepts with several tools to come up with a tool that fits your particular situation, test scenarios, and company.
Installation and setup
If you’re on a Mac, the easiest way to install k6 is to use Brew. Run brew install k6 from your terminal, and you’ll be ready to go in a few seconds.
If you’re on a different operating system, check here for installation instructions that apply to you.
A basic k6 test script
A barebones k6 test script looks like this:
import http from 'k6/http';

export default function () {
  let response = http.get('https://test.k6.io');
}
This script sends an HTTP GET request for the URL https://test.k6.io, which is a simple test site. If you copy that code to your favorite text editor and save it as test.js, you can then run it with the command k6 run test.js.
You’ll get something like this in response:
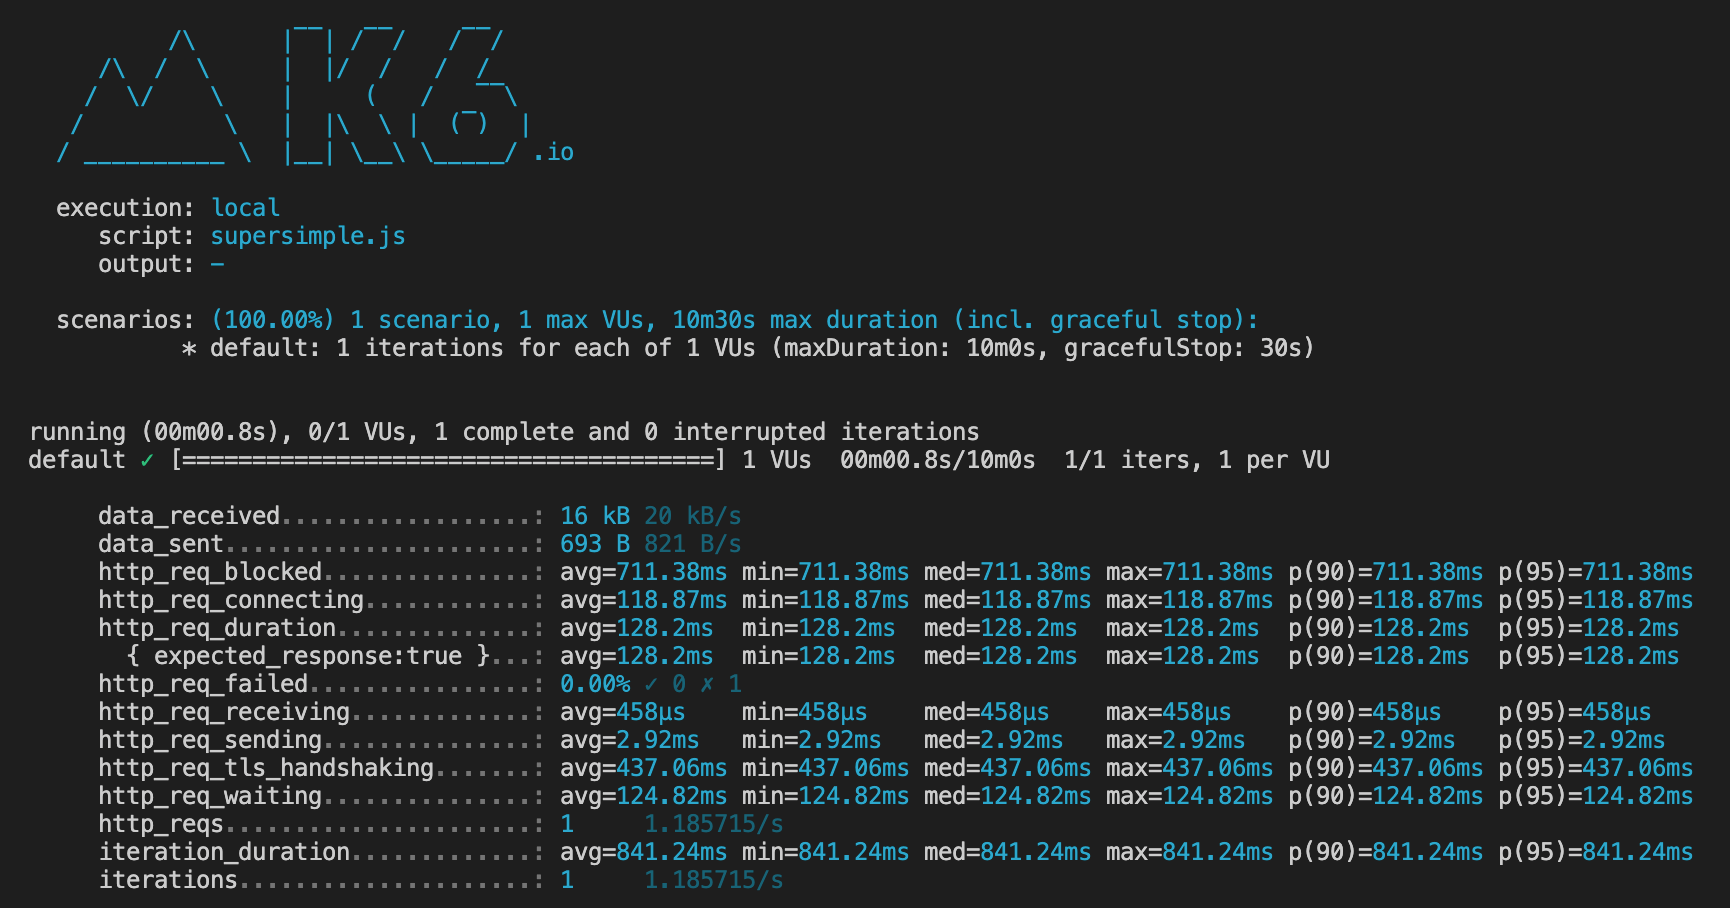 A sample run of a simple local test in k6
The output above means that you’ve executed 1 iteration of your script with 1 virtual user from your local machine. The test run consisted of 1 HTTP request, which had a response time of 128.2 ms (http_req_duration).
It might be tempting to start scaling up the test at this point, increasing the number of virtual users and the duration of the script. But there’s one problem with the script as it is: it’s not realistic.
Making a test script realistic
The purpose of a load testing script is to simulate a real user who accesses your site. In most cases, that involves more than the simple GET request from the script above. Load testing scripts don’t have to mimic a real user exactly, but they do have to be close enough so as to apply the same amount, shape, and distribution of the load on your application server. If your load testing scripts aren’t realistic enough, you may get false positives during testing and discover too late that there is a performance issue in an application component that your scripts didn’t test.
Here are some ways to make your scripts more realistic:
Add static resources
If a page has static resources like images and scripts that are retrieved by a browser automatically, make sure your script retrieves those too, as they will have an impact on the response times you get. Consider excluding static resources fetched from third-party providers unless you’ve gotten their permission to run a load test on their servers.
Set cache and cookie behavior
Review your load testing tool’s default cache and cookie management settings and change them, if necessary, to match the scenario you want to test. First-time visitors to a site won’t have resources cached locally, but repeat visitors may be retrieving resources from the cache.
Add think time
Real users don’t usually fetch the same URL over and over again without stopping. They navigate to your site, then spend some time reading the contents of the homepage before they interact with the page again. Think time is the amount of time that a user spends “thinking”— that is, the delay between requests. Adding a think time that varies between 1 and 5 seconds, for example, prevents the application server from getting artificially bombarded by requests in a way that wouldn’t occur in production.
Using different user paths
A user path is the flow of how a user interacts with the application. What pages do they visit? What information do they type in? So far, you’re only testing one request, but perhaps your users may be performing other actions. The workload model that you put together in the Planning phase will come into play here. Other actions like logging in or paying for items in a cart exercise different parts of an application than browsing does, so the load testing script should reflect the most common user flows through your system. In k6, this is done by adding scenarios, but other tools may call them thread groups or execution groups.
Adding test data
In the same way that users don’t (typically) search for the same keyword over and over again and don’t all log into the same test account, a script shouldn’t use the same data repeatedly. This behavior could cause responses to be cached, leading to misleadingly quick response times, or increased error rates, in the case of multiple virtual users attempting to log into the same account. To prevent that, modify your script to take data from a CSV file instead, letting you add some natural variation.
Setting test parameters
Test parameters are the main characteristics of the test and include the number of users, ramp up, duration, and ramp down. They control the shape of the user load, which you can see when you plot the number of virtual users over time during the test:
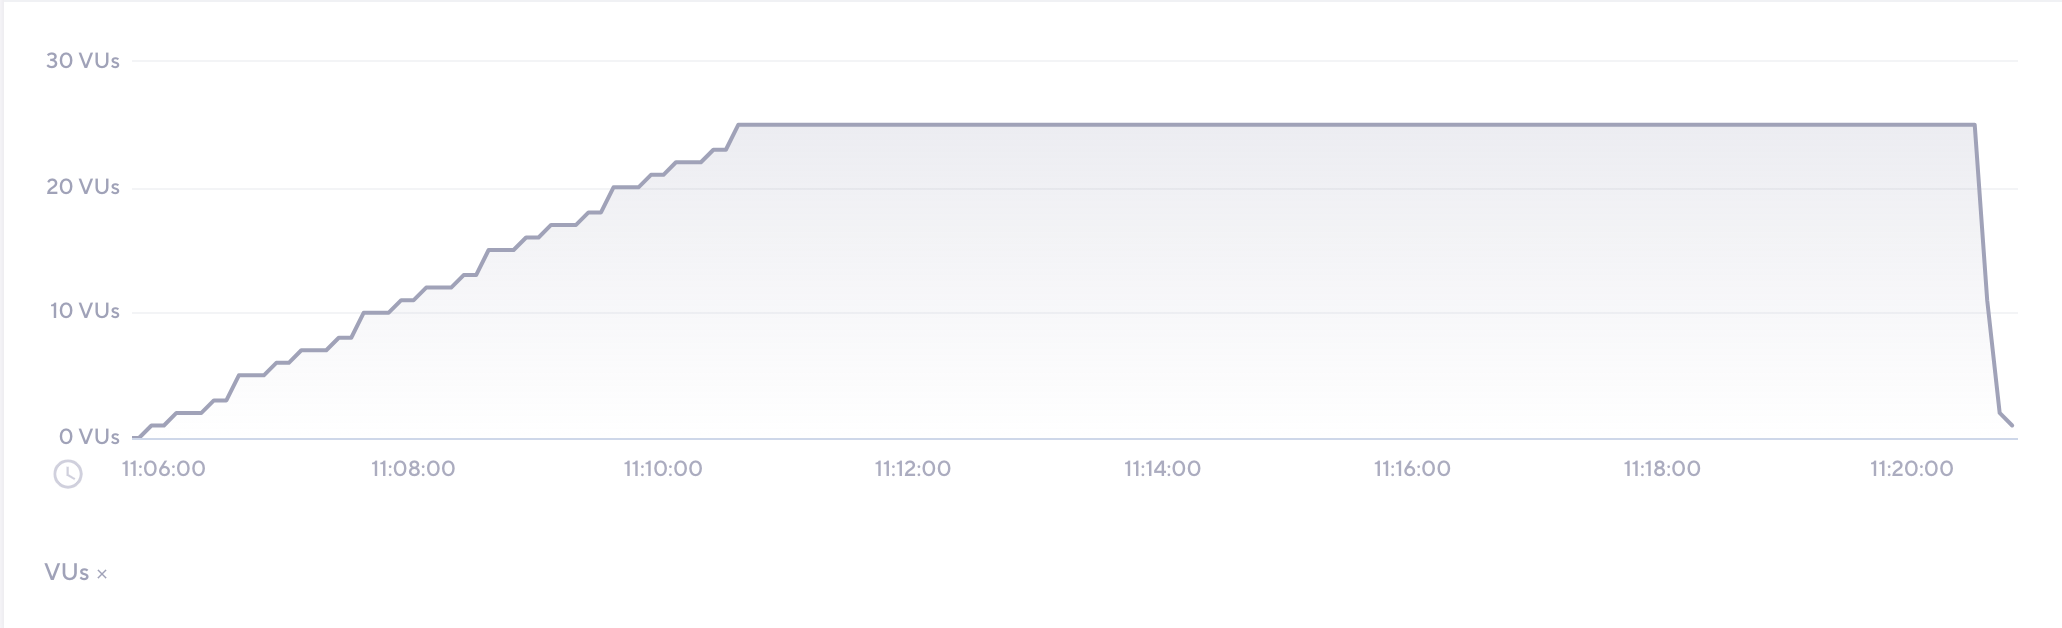 The number of virtual users over time during a load test, as graphed in k6
Ramp up is a period of time during which virtual users are gradually added, usually at the start of the test, and ramp down is when they are gradually stopped. For most applications, ramps are more realistic than all users clicking a link at exactly the same time.
Setting failure criteria
Part of simulating real users is determining what constitutes failures in user experience. You can incorporate failure criteria into scripts by adding response verifications, checks, and thresholds (such as those for response time or error rate). Building these into the script is a good practice to get into, because it defines the limits of acceptable performance from the beginning.
The suggestions in this section are for general use, but there are many situations where taking the opposite approach would be more realistic. Spend some time thinking about what is “realistic” for your application and test scenario.
For your reference, here’s a k6 script that started from the basic script I showed earlier, but has been modified to be more realistic. That link includes a CSV file with login credentials.
Executing load tests
In the course of writing the test script, you probably would have already executed small verification tests, called shakeout tests. It’s a good idea to start with these shakeout tests on a new environment to make sure that both your test artifacts (your script and any other data files) and the environment are ready for full testing.
Running the test
If you’ve been following along with the k6 script so far, all you need to do to run a load test is to execute the following command:
k6 run test.js
This command will run the k6 script according to the test parameters set within it. The test will be executed locally. This is best used for shakeout tests, or if you prefer to run your load test on your own infrastructure.
Realism in test execution
One way can make executing load tests realistic is by matching the location of load generators to the physical location of your users. When you run a load test on machines in your data center, in the same network as your application servers, you will likely see response times that are significantly faster than your users would see. These false positives can look good on the report, but they don’t help you measure real user experience.
Running on the cloud is an easy way to make tests more realistic, especially if most of your end users are external to your organization.
If you’re following along with the k6 script, you can sign up for an account with k6 Cloud (the first 50 tests are free). Since k6 itself is open source, you can also run it on your own cloud infrastructure, but using k6 Cloud is the most convenient way to get started.
Once you have an account, copy your API token from here. Then, run this command in your terminal to give your local k6 installation permission to run on your account:
k6 login cloud --token <YOUR_K6_CLOUD_API_TOKEN>
Once you are successfully authenticated, you can continue to run tests locally using k6 run, but you now have the option of running on the cloud as well:
k6 cloud test.js
k6 will then begin to execute your load test, and you’ll see a screen like this:
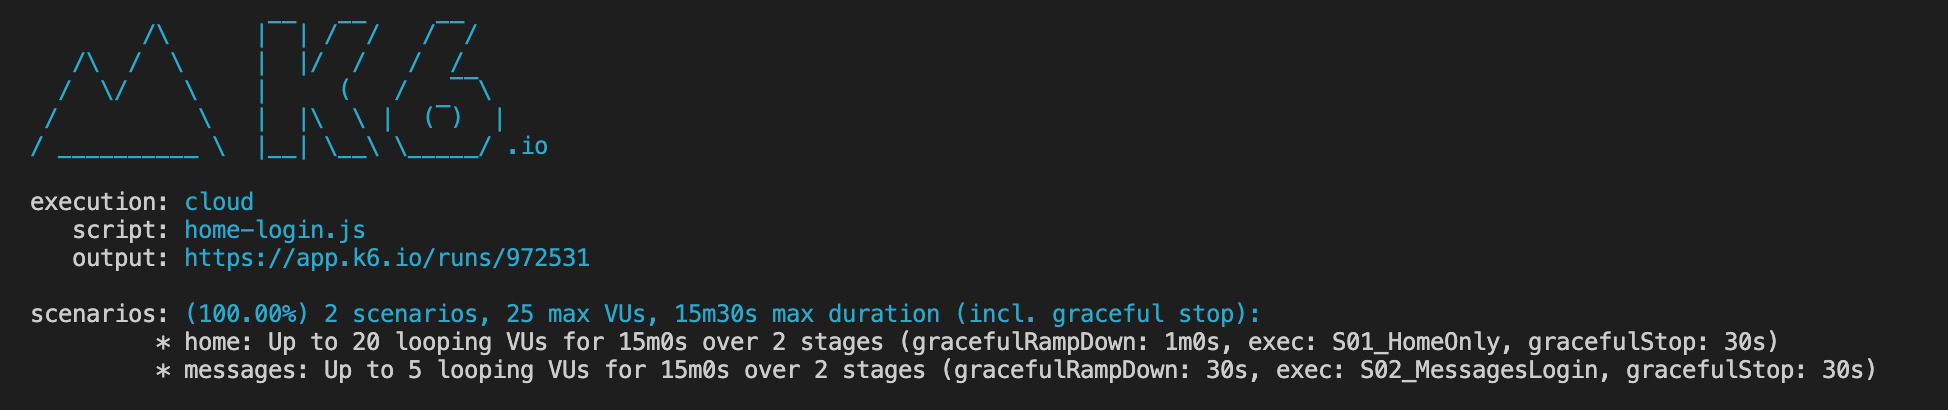
Note that the execution mode is now cloud, to remind you where you’re running the test.
By default, your test will run on the k6 AWS account, in the Ashburn region. However, you can override this and specify other regions, including percentages of your virtual user to run on each, using cloud execution options.
Analyzing load testing results and reporting
Although I’m listing analysis as a different step in the process from execution, the two often (and should) overlap. The output from k6 in the screenshot above contains a link to the dashboard on k6 Cloud, so that you can see the results of the test in real time, as the test is running. Monitoring the test in real time lets you immediately spot issues as they arise, and, if necessary, stop the test to fix them. If the test is being executed by multiple load generators, having a consolidated dashboard is helpful in giving you an overview of the entire test.
 An example of the results after a load test in k6 Cloud
This is also a good time to monitor the health of the application servers and the load generator servers, which you set up monitoring tools for during the planning phase.
A load test is only useful when it’s providing information about the application. If errors occur in large quantities, or if the response time makes it clear that a certain component has failed to handle the load, don’t be afraid to stop the test. Your objective is to get the information you need to suggest performance improvements and solutions for any bottlenecks you find.
Often, you’ll run into issues you can’t solve or even identify during a test. That’s why it’s useful to explore the data that you have after a test. k6 lets you create shareable links to dashboards so that you can involve relevant engineering teams who may be able to help you understand what happened and why. Here’s an example of what that dashboard looks like.
Some projects require formal documentation of test execution by way of a Test Summary Report, but in more agile teams, it may be enough to share the test results dashboard and some supplementary information about what type of tests were run and what problems were encountered.
The most important part of load testing isn’t the execution itself; it’s what you do with the results. Communicating results clearly to stakeholders will make it more likely that performance issues are fixed.
What’s next
The phases I’ve outlined here are a good guide for anyone starting with load testing, but I always recommend that you take what works for your situation and leave the rest. In reality, the phases overlap with each other considerably, especially in more modern engineering cycles.
Another activity I’ve not covered here, but one that I recommend, is adding load testing to your CI/CD pipeline. This continuous testing approach involves automating load testing so that it occurs in regularly, in parallel with other development and testing activities. Continuous testing is a great way to get more value out of load testing, and it ensures that performance is front-of-mind for everyone on the application team.
Happy testing!